
Do you want to know how to move WhatsApp from Android to iPhone? This article is for you. It takes a bit of a process to move your WhatsApp history across operating systems (OS), and we are here to walk you through it. A step-by-step process is detailed below.
Unfortunately, there is no standard procedure for copying your WhatsApp history from an Android OS to an iPhone. In the same vein, it is not easier to transfer WhatsApp history from an iPhone to an Android OS.
That’s not because the file formats are not compatible, it’s just not intended. If both operating systems decided to share data, transferring the chat history from an Android smartphone to an iPhone could be so easy.
Unfortunately, the data on the Android phone is backed up on Google Drive, while it lands on the iPhone in iCloud. And neither device accesses the other’s cloud.
So you have to do the following:
- Back up the chat history on Android locally.
- Download and install a PC utility.
- Download and install iTunes.
- Enable USB debugging on the Android smartphone.
- Transfer the data from the Android phone to the iPhone.
- Register the iPhone with WhatsApp.
- Import the backup while setting up WhatsApp.
How to Move WhatsApp from Android to iPhone!
Contents
First, you need to create a local WhatsApp backup on your Android phone. Although backups via Google Drive are possible, you can not transfer them to WhatsApp for the iPhone.
Create a Local WhatsApp Backup!
To create a local WhatsApp backup, follow the procedure below.
- Open WhatsApp.
- In the main window, tap on the top right of the three dots and open the menu.
- Select ” Settings ” and then ” Chats “.
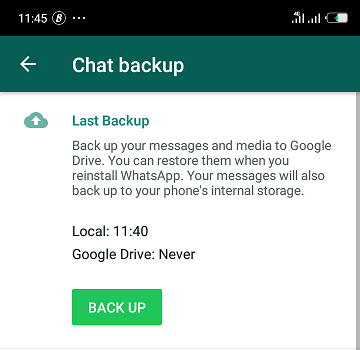
- Navigate to ” Chat Backup “.
- Tap the “BACK UP” button to save the current chat history.
- To save the pictures and videos as well, check the option ” Including videos “below.
Do not prepare the iPhone!
The correct sequence for a WhatsApp history move from Android to iPhone is:
- First, save the database on the Android phone.
- Then transfer the data from Android to the iPhone.
- Then plug the SIM into the iPhone.
- Only sign up with WhatsApp at the end of the iPhone setup!
The reason is that WhatsApp only searches for possible backups after installation and initial startup!
Transfer WhatsApp history from your Android phone to iPhone
- First, if you have not already done so, you should activate Developer Mode and then turn on ” USB Debugging “.
- Now you have to install iTunes, which is recommended for all interactions with the iPhone anyway. Its driver needs every iPhone tool so that you can connect the phone to the PC.
- Download and install the Windows program ” Android WhatsApp to iPhone Transfer “.
- In the next step, you connect both phones with their cables to the PC at the same time. On the Android phone, you would be required to allow USB debugging, which you should confirm.
- Run the installed program ” Android WhatsApp to iPhone Transfer “.
- Under ” File ” select the backup file that you have sent from the phone to the PC.
- Click on the icon ” Android to iPhone “. There you can transfer the backup.
- When you are done, install WhatsApp on the iPhone, launch it, and set it up. During setup, the app asks if you want to bring in the backup, which of course you affirm.
With this method, you can move your WhatsApp from Android to iPhone, retaining your chat history.
However, it is pertinent to note that some functions of the application may not be available for free. You can have full access to the application under the premium service. The App developers need you to purchase it to enjoy full privileges.
Last Words
If you are not able to move your Whatsapp from Android to iPhone, you just have to make do with starting all over on your new device.
Please share this article if you find it helpful. Also, we would like to read your thoughts in the comment section.

")

")
")

